The Simplest Way to Upcycle an Old Dresser
In the ever-evolving world of home decor, upcycling has emerged as a powerful trend, breathing new life into forgotten pieces. Our homes are a canvas where creativity and functionality intertwine, and what was once considered old can seamlessly transform into something vibrant and new. Today, we delve into the art of upcycling an old dresser, a staple in furniture, into a stylish, modern piece. Discover how to harness its potential with painted drawers, DIY techniques, and innovative ideas, turning it into an emblem of both tradition and modernity. Whether you’re looking to infuse your space with fresh charm or engage in a fulfilling project, the journey of repurposing dressers offers endless possibilities.
Discovering the Potential in Every Dresser
Every dresser tells a story. Hidden beneath layers of chipped paint or tarnished wood lies a history waiting to be rediscovered. As we embark on this journey to repurpose, we must first appreciate the inherent value these pieces hold. Whether it’s a vintage find at a local thrift store or a family heirloom collecting dust in the attic, your dresser can be so much more.
Why Upcycle?
- Environmental Impact: Upcycling reduces waste, breathing new life into materials that would otherwise contribute to landfill overflow.
- Cost-Effective: Transforming existing furniture can be more budget-friendly than purchasing new, high-end items.
- Personalization: Tailor each piece to reflect your unique style, creating a home imbued with character.
Getting Started To begin, assess the current condition of your dresser. Inspect the frame, ensuring stability and identifying areas that may need reinforcement. A sturdy wood top can serve as the foundation for many design possibilities, from functional benches to charming storage solutions.
Next, consider the design elements that resonate with you. Are you drawn to minimalist white dressers with a pristine finish, or do you prefer a painted dresser boasting a bold, modern hue? Research DIY techniques and gather your materials, preparing to embark on this creative venture.
By perceiving the potential in every dresser, you unlock a world of transformation that not only revitalizes your home but also redefines your interaction with everyday objects.
Innovative Ideas for a Magical Dresser Makeover
Creativity is the heartbeat of any successful dresser makeover. With a touch of imagination and a dash of flair, you can create something extraordinary. Here’s how you can infuse innovation into your dresser project:
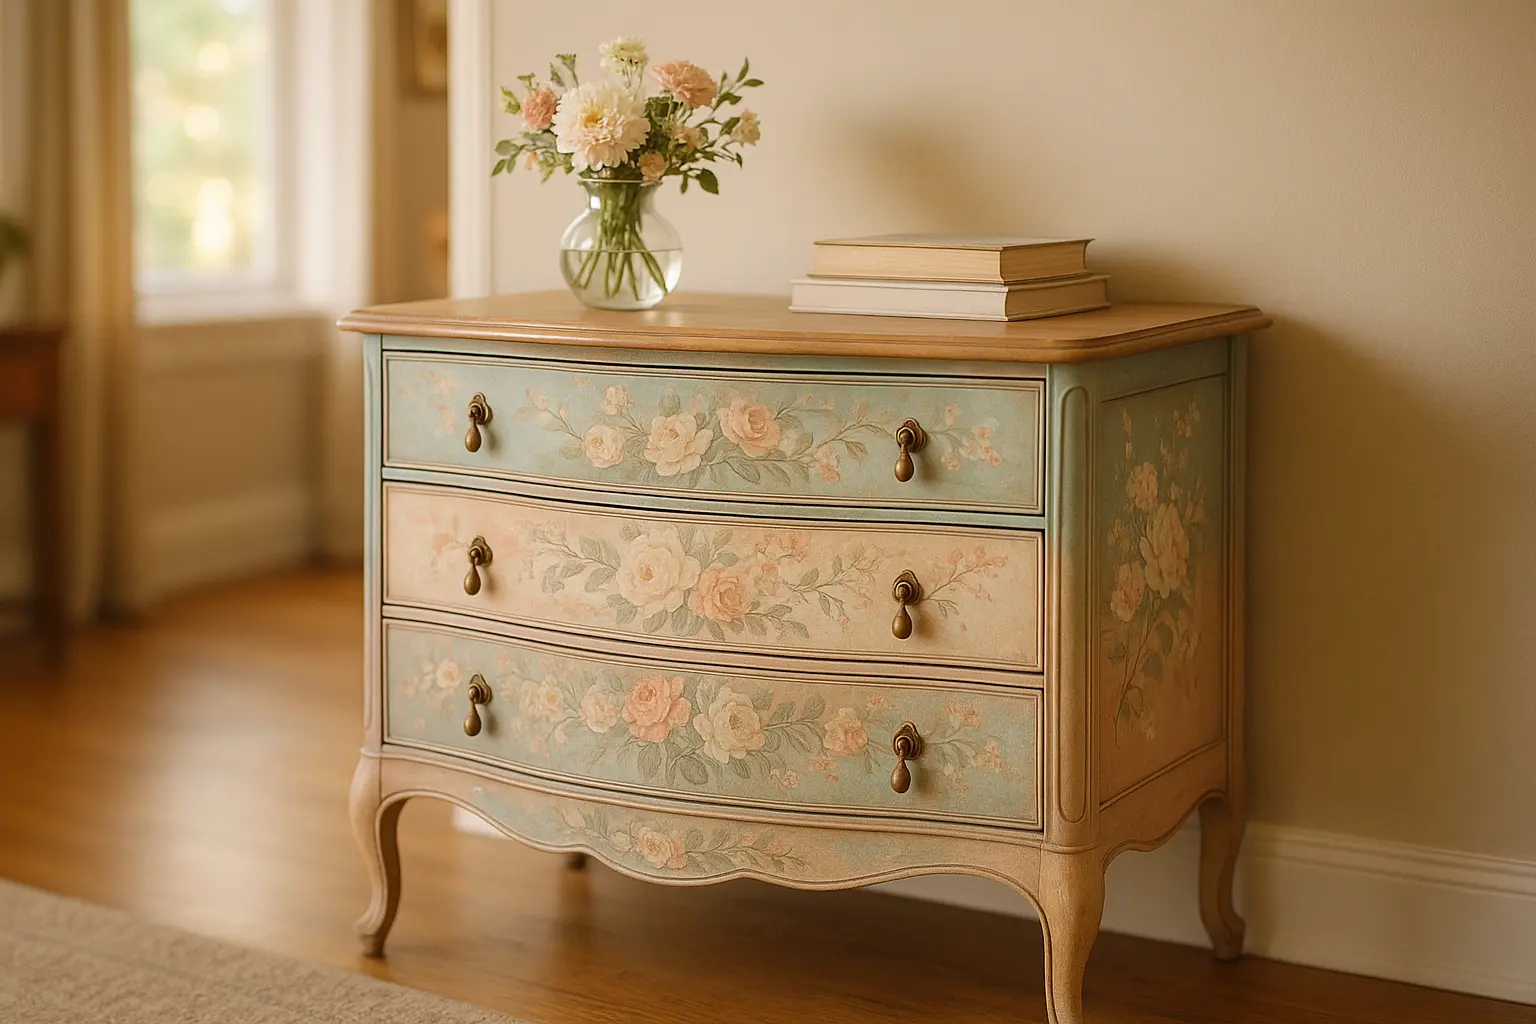
1. Color Palette and Paint Techniques Choosing the right paint can dramatically alter a dresser’s appearance. Consider a two-tone scheme for a contemporary vibe: a light white or pastel for the drawers and a dark, bold color for the frame. For a rustic touch, experiment with chalk paint to give your dresser an antique look.
2. Repurpose and Redesign Transform your dresser into something functional and unexpected. Remove the top drawers and convert the space into open shelving for a bench with storage beneath. Alternatively, a dresser can become a chic bathroom vanity by adding a sink, enhancing both form and function.
3. Hardware Details Never underestimate the power of new drawer pulls. Swapping old knobs for modern, sleek handles can inject a fresh aesthetic, turning your dresser into a statement piece. Opt for brass finishes for a touch of elegance or colorful patterns for a playful twist.
By approaching your dresser with these innovative ideas, you’re not just refurbishing; you’re creating a standout piece that reflects your personality and adds a touch of magic to your home.
DIY Techniques for a Seamless Dresser Transformation
Embarking on a DIY dresser transformation is more than a hobby; it’s a journey into creativity and craftsmanship. But how do you ensure your project is both seamless and successful? Let’s explore some expert techniques:
Preparation is Key Before diving into any makeover, ensure your dresser is clean and free from dust or residue. Sanding is a crucial step for a smooth finish. Use a fine-grit sandpaper to create an even surface, and always remember to fill any holes or cracks with wood filler for a polished look.
Painting and Sealing Once prepped, select a high-quality paint suitable for wood. Apply thin coats, allowing each layer to dry thoroughly before the next. To achieve a professional look, use a brush for smaller areas and a foam roller for larger surfaces. Seal your work with a clear varnish to protect against chips and scratches, ensuring longevity.
Assembly and Adjustment Reassemble your dresser carefully, checking that each drawer is aligned perfectly. If you’re introducing new hardware, measure accurately to avoid any misplacement.
These DIY techniques not only enhance the aesthetic appeal of your dresser but also equip you with skills repurposed throughout your home. Every brushstroke and detail contributes to a transformation that is both functional and fabulous.
Every upcycled dresser is a testament to the beauty of renewal. As you step back to admire your handiwork, you’re not just viewing a piece of furniture; you’re witnessing a blend of past, present, and future. From conceptualizing ideas to executing DIY modifications, this journey encapsulates the spirit of repurposing and sustainability.
Upcycling an old dresser is an art form that transcends mere decoration. It invites you to engage with your surroundings, infusing them with personality, functionality, and unexpected elegance. Remember, in every dresser, there’s the potential for reinvention and a story waiting to be told. May your newly transformed dresser inspire creativity and joy in every room it graces.
FAQ
What are the first steps to take before starting to upcycle an old dresser?
Begin by thoroughly cleaning the dresser to remove any dust or grime. Next, inspect the piece for any structural issues or damages that need repairs. Once it’s clean and sturdy, consider sanding it down to create a smooth surface for painting or staining.
What materials and tools are essential for upcycling a dresser?
You’ll need basic tools like a screwdriver, sandpaper or a sander, paint or stain, brushes or rollers, and protective gear such as gloves and a mask. Depending on your design, you might also require new hardware like knobs or handles.
How can I choose the right paint or finish for my dresser?
Decide whether you want a bold color for a statement piece, a neutral tone for a classic look, or a wood stain to enhance natural grain patterns. Consider the room’s color scheme and the dresser’s role in the space. Be sure to use paints suitable for furniture, typically labeled as interior or furniture paint.
What creative ideas can I try to enhance the look of my upcycled dresser?
Consider adding wallpaper or stencils to drawer fronts for a distinctive pattern. You could also switch out the standard knobs for unique or vintage hardware. Another idea is to add legs to give it a modern, elevated look or to paint each drawer a different shade for a playful twist.
How can I ensure the durability of my upcycled dresser?
To ensure longevity, apply a clear sealer or topcoat after painting or staining. This protects the finish from wear and tear. Regularly check and tighten any hardware to keep the dresser functional. Additionally, place it away from direct sunlight and humidity to avoid warping or fading.


Post Comment